Tuesday, July 31, 2012

Interior Design Color Schemes #1

As I mentioned a few weeks ago, my husband and I recently bought our first house. Since then, I've been looking more and more into interior design to come up with some ideas of how to decorate our new home. Some blogs I came across had the interesting idea of taking a photograph and selecting certain colors from the image to come up with a color palette. It seemed like fun, and I wanted to give it a shot! :)

I dug around some of my old photographs - favorite images of past vacations and some of my favorite flowers - and found some to use as inspiration. Below are the first two photographs I used, along with an inspiration board of interior furniture and decor that matches the color scheme. Check back tomorrow and next week for further installments in this four-part series!


Inspirational Photo #1: A colorful plant in Barcelona


I took this photograph while on a Mediterranean cruise in 2010. I've always loved this picture and its use of the secondary triad of the color wheel: purple, orange, and green. None of the colors are quite the saturated version of their color wheel relative, so the color scheme feels both unique and fresh and modern. This purple is rather blue in places, and its lighter shades are almost more periwinkle than lavender. The orange and green, meanwhile, both lean toward the yellow end of their respective spectra. The lime green and yellow-orange act as a great contrast to the cool bluish-purple.


Because it's such a modern color scheme, it really lends itself to unique furniture and bold, graphic patterns. The easiest way to incorporate all three colors in a single room would be to use a light orangey wood as the basis of the furniture (like we see in the middle picture on the top row). This simple solution encourages the orange to be read as a neutral backdrop, and once that core is established it's easy to add lime green, dark purple, and lavender accents into table centerpieces, curtains, wall paint, area rugs, accent chairs, and throw pillows.


Inspirational Photo #2: The volcanic hot springs on the Greek island of Santorini


Though it perhaps looks a little unfriendly, the brown water near Santorini's volcano is both completely natural and safe. The water is several degrees warmer than the surrounding blue water, and has been thought since ancient times to have magical healing properties. The muted color scheme that I pulled from this photograph (taken on my honeymoon in 2011) features a lot of classic interior design shades. The gray-blue and light minty green are calming and relaxing, while the two shades of brown (one lighter and pinker and the other rich and chocolatey) act as great neutrals.


Many of these photos feature either the blue or green as the most prominent color, and use tan and brown as accent colors, but you could just as easily use both the blue and green if you wanted. Blues and greens look great together - both because they're found together in nature and because they're so close to each other on the color wheel.

-

Don't forget - though these inspiration boards feature home decorating ideas, these color schemes could work just as well for any event! I'll post more photos tomorrow. :)


"Like" Invites by Andrea on Facebook!


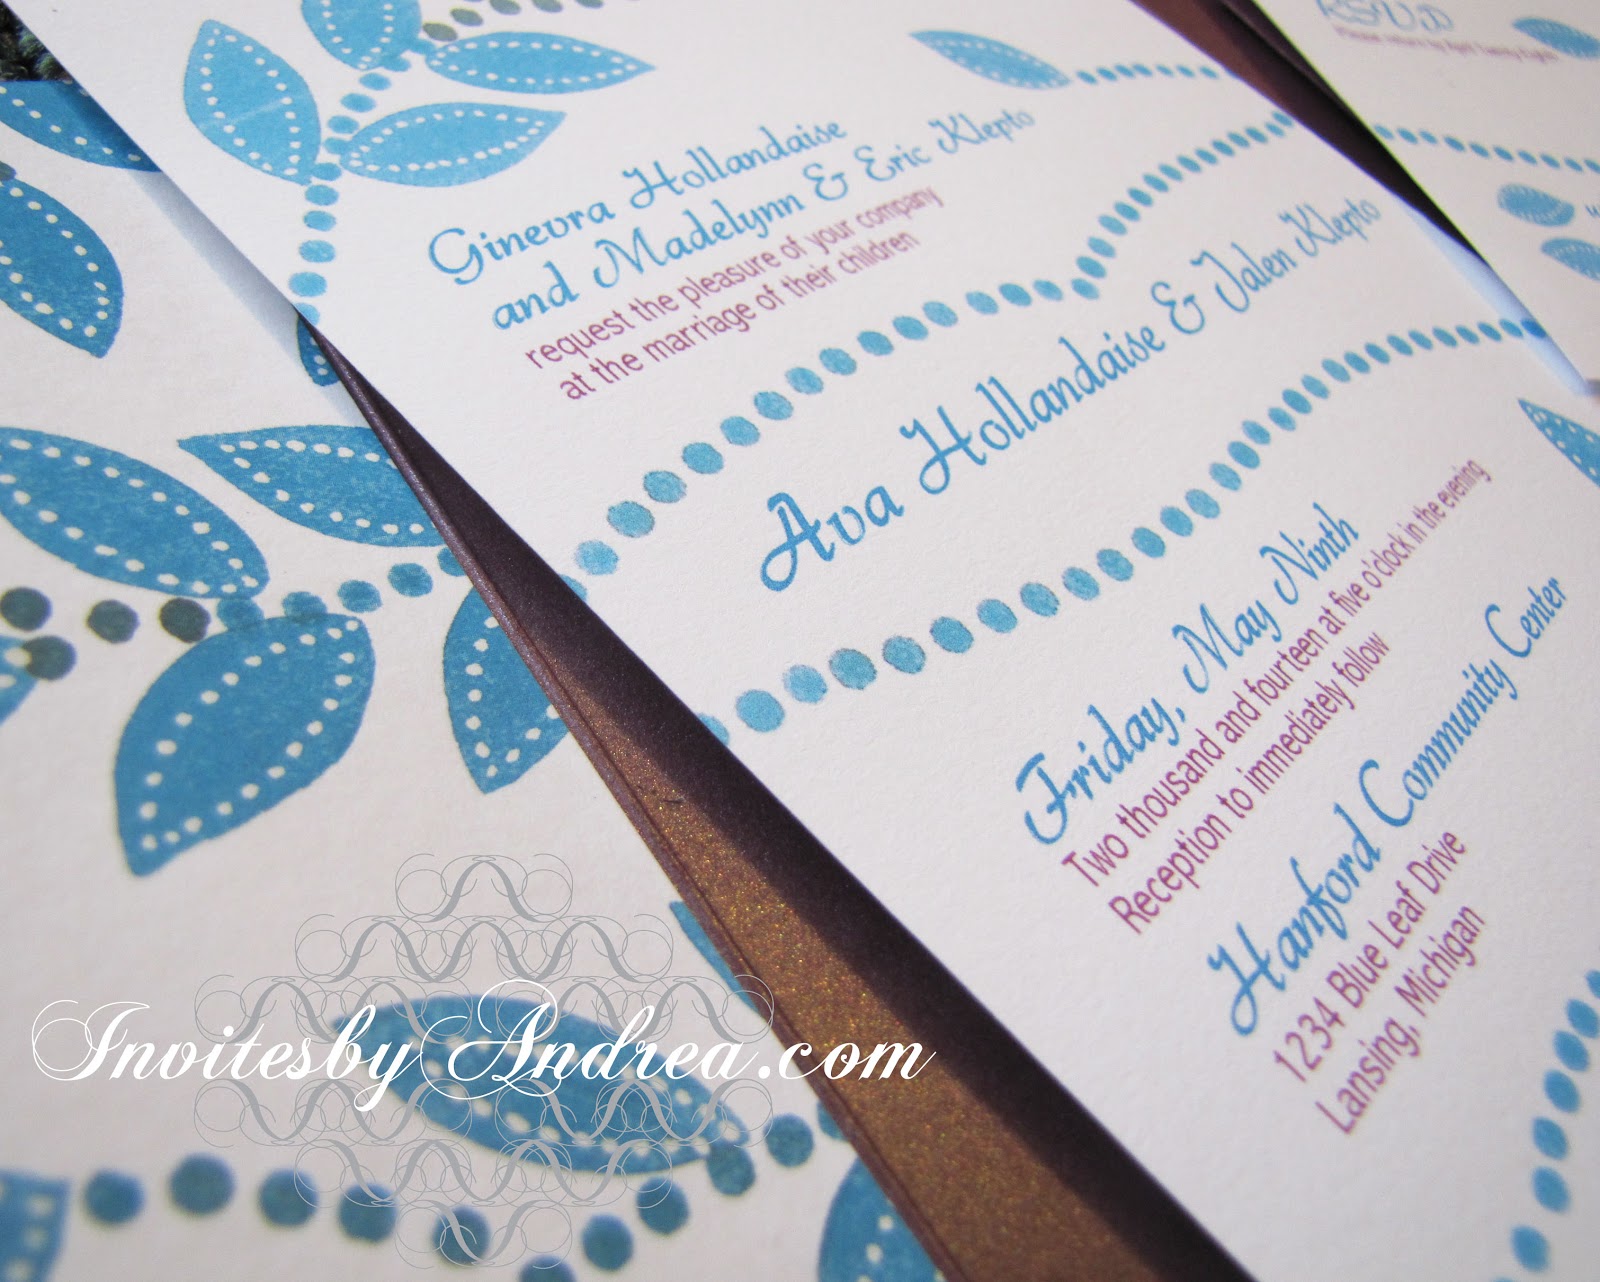
Shameless Plug Time: Love these color combinations? Looking for custom stationery made to match these colors (or whatever other color combinations you're using for your event)? Visit Invites by Andrea to view more samples, download a catalogue pdf, or fill out a design request form. Or shoot me an email to ask me your questions or learn more information.

Sunday, July 29, 2012

Sunday Sample Spotlight: "Jazz Hands"

Themed events are so fun - especially if guests come in appropriate costumes! :) Themes can instantly make even the most formal event feel more fun and casual, and they work for almost any occasion, including weddings, rehearsal dinners, birthday parties, and dinner parties. This week's Sunday Sample Spotlight mixes a spirited Roaring Twenties theme with a modern red and navy color scheme.


"Jazz Hands" - Invitation

This dark blue metallic "petal" envelope has four flaps (two of which I decorated in red argyle scrapbook paper) which fold in on itself to create its own envelope. The red scrapbook paper really pops against the dark navy, and calls to mind the red velvet curtains of a theatre. I wanted to use the "petal" envelope for this theme because I loved the act of opening up the envelope to this lively scene - like how one might sneak into a clandestine bar for some moonshine and a burlesque show. ;)


I created these silhouettes by tracing images I found on Google with Adobe Illustrator's pen tool. Then, I drew the music notes freehand with the pen tool so they'd feel more syncopated (instead of exact and manufactured), added a line of small red diamonds to border the left and right sides of the invitation (to relate back to the argyle pattern of the scrapbook paper on the envelope), and chose a period font.


Voila! A unique invitation perfect for any casual or formal Roaring Twenties event!


Next week's Sunday Sample Spotlight: "In Grape Demand"


Click here to view all Sunday Sample Spotlight posts.

"Like" Invites by Andrea on Facebook!

-

Shameless Plug Time: Love this invitation (or others featured on this blog)? Want something similar (or something completely custom) designed for your event? Visit Invites by Andrea to view more samples, download a catalogue pdf, or fill out a design request form. Or shoot me an email to ask me your questions or learn more information.

Friday, July 27, 2012

Fancy/Funky Friday: Patterns Anastasia & Cassidy

Both of today's patterns were created using the letter "Q"; they're so different because of the font I selected, and the other pattern elements that were incorporated into the design.


First, the "fancy": Pattern Anastasia


This funky but thinly-stroked font featured an interesting capital "Q" that I couldn't resist using in a pattern. I paired it with some more elegant characters of the same font to create this unique "fancy" design. Though up close, the odd details and extreme angles seem a little too playful to be truly "fancy," the pattern still looks very elegant from far away, where the thin purple lines take on a lace-like appearance that goes well with the small circle-like negative spaces.


And now, the "funky": Pattern Cassidy


Pattern Cassidy, on the other hand, is much simpler in appearance. I added a block-like capital "O" to a collection of four capital "Q"s to make each flower-like form, then tilted the pattern unit at an angle and lined them up with their neighbors so that their edges wouldn't quite touch. The negative spaces reflect the squareness of each pattern unit, giving the whole design an almost grid-like feel.

The thick lines, angled pattern units, and simplistic, bold design all add to the modern, funky characteristics of this pattern. It shows a completely different way to use a capital "Q" to make another unique design. :)


-

Click here to see all posts related to "Fancy/Funky Friday" 


Shameless plug time: Love my patterns? I incorporate them into a lot of the artwork I create, from stationery for Invites by Andrea to the watercolors I paint. Check out Invites by Andrea's website to see examples of these patterns in use or drop me a line at andrea@invitesbyandrea.com to let me know what you think!

Tuesday, July 24, 2012

Blue and Lime "Love Letter" Stationery


I recently had the opportunity to design custom wedding stationery for a couple who got married in Michigan in June. Since the groom was from Australia, the couple wanted a design centered around a long-distance letter-writing theme.


I designed the invitation, information page (which included directions to the wedding chapel and directions from the chapel to the reception hall), reply cards, thank you notes, belly bands - and even the outside envelopes, inside envelopes, and reply envelopes, where I printed all necessary addresses directly on the envelopes from my computer.


The main idea of the design was that the invitation would resemble a handwritten letter. We spent a long time looking at different font choices to find the perfect look, and even then ended up replacing the capital S with an S from a different (but similar) font, since we didn't like the capital S that came with the font we chose.

In the top right corner of the envelope, I placed two fake stamps. To get the silhouettes of the couple, I used Adobe Illustrator's pen tool to trace photographs the bride emailed me of their faces in profile. Then, I modified a pattern I'd designed that I liked, curving it around a thin white circle to add decoration to the stamp images. The bride's profile went on a U.S. stamp, while the groom's was placed on an Australian stamp as a nod to their respective home countries. I even Googled how much a first-class stamp cost in Australia, and wrote the correct stamp prices on the top right corner of the stamps to reflect the post in the two different countries. (In case you're curious, a first-class stamp in the U.S. costs 45 cents, while an Australian stamp costs 60 cents.)

Finally, I designed another round stamp image similar to the stamps used at the post office. The circle states their wedding date and the city of the wedding chapel.


I used a stripe of pattern to decorate the bottom of the invitation, information page, reply card, and thank you notes. The lime adds a fun hint of color while also tying back to the lime and blue stamps in the upper right corner. I curved the pattern around their names to decorate the blue belly bands that wrapped around the finished stationery set, and also used the same patterned circles from the stamps as the "check boxes" for the reply cards.


It took even longer than usual to print and assemble everything, since I had to wrap the belly bands around the finished stationery set and I also printed on each envelope. On the main outside envelope, I included the main address (decorated just like the belly bands with a rectangle of blue, thin lime green stripes, and a white rounded rectangle with a hint of the pattern I used throughout the designs decorating either side) and the return address (decorated in a thin lime green rounded rectangle and the same modified pattern).

The actual invitation and reply card was all written in the handwriting font we selected, but I used an all-caps sans serif font in dark gray to write the directions on the information page and to write the addresses on the envelopes. This same sans-serif font was used in the gray round "post office" stamps. For the names, I always used the handwriting font, even for the addresses.


Each inside envelope was printed with the names of the invited guests. The inside envelope had the same lime green pattern design with blue lettering as the return address on the outside envelope. The outside envelope was lined with bright blue, while the inside envelope was decorated with a slightly metallic lime green liner.


The whole stationery set turned out beautifully. The bright blue and lime green are a perfect summer color combination, and they added a fun pop of color against the formal cream-colored paper and envelopes.


-

Shameless Plug Time: Love this invitation (or others featured on this blog)? Want something similar (or something completely custom) designed for your event? Visit Invites by Andrea to view more samples, download a catalogue pdf, or fill out a design request form. Or shoot me an email to ask me your questions or learn more information.

Sunday, July 22, 2012

Sunday Sample Spotlight: "The Grand Haven Shore"

In the summer of 2007, my family went on a short vacation to Grand Rapids, since my brother and I had never been (despite living in Michigan our whole lives). One day, we drove to Grand Haven just to walk around the picturesque town. On our way back to the hotel, we found this little beach on Lake Michigan. It was completely empty - save for a few seagulls and these sail-less sailboats, which dotted the sand so nonchalantly that they looked as if they'd just washed up on shore.

"The Grand Haven Shore" - Invitation Duo (invite & information sheet)

The image used on both the invitation and information page (slipped into the pocket on the right) is a graphic adaptation of a photograph I took of that beach. I traced the photograph with the pen tool in Adobe Illustrator and simplified the shapes and colors so that only cyan, green, white, black, and a light sandy color were used. The minimalist representation gives it a more modern, casual feel while still appearing, from a distance, to be photographic.


For the envelope, I chose a dark blue metallic "Cascade" pocketfold, which emphasizes the horizontal view of the landscape. The dark blue provides a nice contrast to some of the light colors in the illustration (such as the white boats and sail posts, the light blue background, and the sand).


This design would be great for any beach-themed event, including weddings and more casual parties.


Next week's Sunday Sample Spotlight: A Roaring 20s themed invitation!


Click here to view all Sunday Sample Spotlight posts.

"Like" Invites by Andrea on Facebook!

-

Shameless Plug Time: Love this invitation (or others featured on this blog)? Want something similar (or something completely custom) designed for your event? Visit Invites by Andrea to view more samples, download a catalogue pdf, or fill out a design request form. Or shoot me an email to ask me your questions or learn more information.

Friday, July 20, 2012

Fancy/Funky Friday: Patterns Rhiannon & Kacie

Happy Friday! Here are today's "fancy" and "funky" patterns.


First, the "fancy": Pattern Rhiannon


Pattern Rhiannon is a typical "fancy" pattern. Its lines are elegant and curvy, and there is a nice balance between negative space and positive space. I particularly love the super thin lines that weave in and out throughout this design - they create thin diamond-like shapes that provide an underlying structure to the pattern and give it a regal feel.

From a distance, those thin lines disappear, and it is the interesting white shapes that become the most prominent part of the pattern. Those negative spaces are reminiscent of cameo jewelry and ornate, decorative frames, further confirming Pattern Rhiannon as a "fancy" design.


And now, the "funky": Pattern Kacie


Pattern Kacie emphasizes horizontal lines, but adds hints of interest along the way. The geometric vertical designs that pop against the plain stripes look almost like hieroglyphics or tribal symbols, and it is these "thorns" that go against the grain of the pattern that make it fit perfectly in the "funky" category.

This pattern reminds me of tribal tattoos and barbed-wire fences, and this general feeling along with the emphasis on straight lines make this one of my most masculine patterns. Because of this, I think it looks best dressed in dark tones (navy blue, burgundy, dark green), and earthy neutrals (such as brown and tan).


-

Click here to see all posts related to "Fancy/Funky Friday" 


Shameless plug time: Love my patterns? I incorporate them into a lot of the artwork I create, from stationery for Invites by Andrea to the watercolors I paint. Check out Invites by Andrea's website to see examples of these patterns in use or drop me a line at andrea@invitesbyandrea.com to let me know what you think!

Monday, July 16, 2012

My Paper Anniversary

Today is my one-year wedding anniversary! Back in 2010, I started designing all of my wedding stationery - and enjoyed it so much that I decided I wanted to design invitations for others' weddings as well! Now, Invites by Andrea has been in business for more than a year. It's amazing how quickly time flies. :)

In April 2011, I started posting about my upcoming nuptials and the projects I was working on for the event. Besides my stationery, I also painted watercolors for the reception tables and constructed a card box to match our wedding colors of coral and jade. As you can see from all the links in this paragraph - I've already posted a lot of blog entries about that event. Now, there is nothing else to say but remind you of this:

Though the name "Invites by Andrea" suggests that I design stationery, my skills are not limited to invitations only. I also design and print announcements, reply cards, thank you notes, save-the-dates, maps/directions, programs, menus, escort/place cards, and table markers. As a watercolorist, I can also paint decor for your wedding, whether that's patterned centerpieces for your reception, custom card boxes, or wall-hung paintings. I also have experience making books - which can act as photo albums, keepsakes, gifts, or guest books.

"Invites by Andrea" is more than just invitations. If you have another idea about how to make your event fantastic (even if I haven't listed it here!), don't hesitate to contact me. I might be able to create just what you have in mind! :)


Email: andrea@invitesbyandrea.com
Website: http://invitesbyandrea.com

Like "Invites by Andrea" on Facebook!
Wedding Wire Reviews

Sunday, July 15, 2012

Sunday Sample Spotlight: "The Marble Index"

Almost exactly a year ago, my husband and I traveled to the Greek islands on our honeymoon. It was his first time in Greece, but I'd been once before, when I took a "Mediterranean Cultural History Tour" study abroad trip back in 2008.

We met up in Zurich, Switzerland for a quick orientation, and then traveled through Italy (spending a few days each in Venice, Florence, Rome, and Naples) before taking a boat from Brindisi to Patras, Greece. There, we took a bus around Greece for a few days (stopping in Olympia and Nafplion), took a boat to Crete (Greece's largest island), and then returned to the mainland to visit Delphi, the monasteries at Meteora, Thessaloniki, and the capital city of Athens. It was definitely one of the highlights of my college years, and I loved Italy and Greece so much that I returned to Italy in 2010 and Greece in 2011.

Today's Sunday Sample Spotlight is based on a photograph I took on Crete's Matala Beach - famous for its cliffside caves right off the beach.

 
"The Marble Index" - Invitation Duo (invite & reply card) with matching Save-the-Date and hotel information sheet

For the envelopes, I chose an ivory linen paper because I liked the almost handmade texture they had. I added to this feeling by using textured brown cardstock to back each stationery item, and by lining the inside flaps of the petal invitation envelope with scrapbook paper that had an implied marble texture printed on it.


I picked these textures to play up the history of Greece. The marble scrapbook paper (which I also scanned in and used softly in the background of each printed stationery item) obviously calls to mind ancient marble sculptures, while the linen texture of the envelopes and cardstock felt like old paper while looking like the color of sand - bridging a gap between the past and present of Crete.


The image of the beach chairs and umbrella were traced from a photograph I took on Matala. I used Adobe Illustrator's pen tool to turn the photograph into a fun, modern graphic that hints at the casualness of a beachside wedding and adds a nice balance to the formality of the linen and marble textures.


Many public Greek beaches have chairs and umbrellas for rent right on the beach. You just sit down and relax, and eventually the owners will come around and collect a few euro coins. I wish more American beaches had lounge chairs and large umbrellas for rent! :)


Next week's Sunday Sample Spotlight: I'll bring the beach-theme a little closer to home, with an illustration of Grand Haven, Michigan!


Click here to view all Sunday Sample Spotlight posts.

"Like" Invites by Andrea on Facebook!

-

Shameless Plug Time: Love this invitation (or others featured on this blog)? Want something similar (or something completely custom) designed for your event? Visit Invites by Andrea to view more samples, download a catalogue pdf, or fill out a design request form. Or shoot me an email to ask me your questions or learn more information.

Friday, July 13, 2012

Fancy/Funky Friday: Patterns Andrea & Gigi

Because my one-year wedding anniversary is in three days, this week's theme is reflecting on the projects I finished for my own wedding. Today's "fancy" pattern is (though not the first pattern I ever designed) certainly the one that planted the seed in my mind to create more patterns and use my designs to decorate the borders of wedding stationery.


First, the "fancy": Pattern Andrea


Pattern Andrea (named after myself not for narcissistic purposes but simply because it was the one I designed for my own wedding) was created from the curled line of the Baskerville italic ampersand character. Ampersands are some of my favorite characters to make patterns from, and I love how fitting they are to wedding themes. What could be more symbolic than an ampersand for an event celebrating the union of two people?

This pattern worked great for my wedding stationery because I used Baskerville italic in several places throughout the invitation; the text and pattern instantly connected to create a coheisive design. I also loved the slightly abstract heart-shaped forms that the pattern hinted at. I had our cake baker decorate each tier of our four-layer cake with a single strip of this pattern, and hand painted several watercolor placemats to incorporate the pattern into our reception table centerpieces. And of course, I used the pattern on all of our wedding stationery, from the thank you cards (I ordered so many that I'm still using them for non-wedding gifts!) and invitations to the table markers, escort cards, programs, and menus the guests picked up on the day of the event.


And now, the "funky": Pattern Gigi


Pattern Gigi (so named because of the prominent lowercase "g"s I used to create it) is a much bolder pattern. Because the lines are so thick, it works best as a large, graphic pattern. When it's small, the thick lines tend to bleed together, making it almost a solid color field instead of a fun, modern pattern.

Gigi has a fair bit of white negative space and the horizontal stripes of pattern create obvious divisions where the underlying structure is clear. These characteristics help calm it a little; Pattern Gigi is only projecting with the strong, clear voice of a public speaker - not screaming like a toddler. :)


-

Click here to see all posts related to "Fancy/Funky Friday" 


Shameless plug time: Love my patterns? I incorporate them into a lot of the artwork I create, from stationery for Invites by Andrea to the watercolors I paint. Check out Invites by Andrea's website to see examples of these patterns in use or drop me a line at andrea@invitesbyandrea.com to let me know what you think!

Tuesday, July 10, 2012

Change of Address Cards

It's been a very busy summer so far. Just before we left on our out-west road trip, my husband and I bought and moved into our very first house! Making the transition from renting to owning was something we've wanted to do for months - and it's great to have the extra space when I'm designing, printing out, and assembling stationery! :)

With the internet, it's pretty easy to just post your new address on whatever social networking site you prefer to let all of your friends and family know where you're living now - but I'm a little wary about letting all of my Facebook friends know my exact address. Instead, it's safer (and more personal!) to mail a change-of-address postcard to all of your favorite people. 

Most people love to receive a tangible piece of mail - since it's so rare these days, it draws more attention and really makes an impact. Though it's not quite as exciting, email is also an option (and a great one if you're trying to save some money). Spruce up the email or postcard with pictures of your new place and don't forget to include your new address. Many people don't bother to send change-of-address information anymore, so if you do, you'll be the poster child of thoughtfulness - and you just might receive a housewarming gift or two in the process!


 -


Shameless Plug Time: Love this stationery idea (or others featured on this blog)? Want something designed for your own change-of-address or other event? Visit Invites by Andrea to view more samples, download a catalogue pdf, or fill out a design request form. Or shoot me an email to ask me your questions or learn more information.

Sunday, July 8, 2012

Sunday Sample Spotlight: "Let Me Be Myself"

Today's Sunday Sample Spotlight features a unique color combination of dark plum, dark turquoise, and bright snow white. With such a modern color scheme, the bold vine pattern looks even more fresh and fun, giving this stationery set a playful, casual vibe.


"Let Me Be Myself" Invitation Duo (invite & reply card)

For the envelope, I selected a dark purple metallic "Himalaya" pocketfold envelope, which folds closed to fit into a standard A7 invitation envelope and has a little pocket on the right to house reply cards, reply envelopes, and any other information you wish to include for your guests.


I lined the left flap and right pockets with funky vine-patterned scrapbook paper I had, and then scanned in the leftovers to use on the printed stationery. I selected the blue leaves and dots off of the paper and added it as decorative elements around the invitation and reply card.

I put a leaf-less line of dots around the couple's names to draw the eye to that information, and used the same blue and purple colors found on the envelope and leaf designs as the font colors to help tie it all together.


I used two leaf shapes from the design as the "reply boxes" on the RSVP card, and made the line for guests to write their names out of the decorative dots. Whenever I get a chance to make part of the design functional on the RSVP card, I definitely try. It artistically connects the two items to help them seem like a cohesive set, while at the same time using the design elements in a new way to keep them from feeling too stale and repetitive.


Next week's Sunday Sample Spotlight: Grecian beach-themed stationery perfect for a destination wedding!


Click here to view all Sunday Sample Spotlight posts.

"Like" Invites by Andrea on Facebook!

-

Shameless Plug Time: Love this invitation (or others featured on this blog)? Want something similar (or something completely custom) designed for your event? Visit Invites by Andrea to view more samples, download a catalogue pdf, or fill out a design request form. Or shoot me an email to ask me your questions or learn more information.